GloveBox: Difference between revisions
| Line 129: | Line 129: | ||
|- | |- | ||
|[[File:Lowerpanel1.png|200px]] | |[[File:Lowerpanel1.png|200px]] | ||
|| | ||3 | ||
|| | || | ||
|- | |- | ||
|[[File:Lowerpanel2.png|200px]] | |[[File:Lowerpanel2.png|200px]] | ||
|| | ||1 | ||
|| | || | ||
|- | |- | ||
Revision as of 18:55, 3 September 2022
This is a low cost solution for having a clean room environment for handling dies and other components which require a clean room environment.
While there are commercial solutions available for sale, they typically cost several thousand dollars, while this box is designed in a way, that it can be constructed from parts usually found in your local hardware store, and is typically below thousand dollars.
The design was originally based on the premise that the whole goal is just to have some quasi-airtight enclosure of some kind, where a circular airflow can be achieved which is purified by pumping the air through multiple stages of HEPA filters, while accessing the objects to be handled by using gloves fixed to the enclosure.
For obvious reasons, a glove box only makes sense when the material to be handled is visible, so acrylic glass was chosen as material for the enclosure.
During the development process it turned out, that just using glue isn't sufficient for holding the sheets of acrylic glass together in a box shape, because the weight of the material, puts too much stress onto the glue, which compromises the isolation and lets external dust enter, additionally, after a while the glue gives up under the mechanical stress, and the box falls apart.
For this reason additional aluminum extrusions are being used, for giving the whole box more stability.
This only increases the cost minimally because the main cost of the BOM ironically is in the acrylic glass.
Some 3D modelling of how the box is supposed to look can be found in the repo here: https://git.libresilicon.com/?p=redmine/mini-clean-room-glove-box.git;a=tree
Material generally required
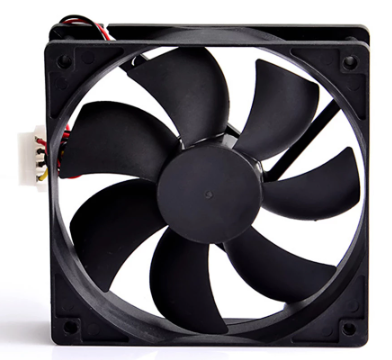
For the airflow 120mm 12V PC fans like the one shown here are being used, depending on the supplier the price per piece can vary between less than a Euro and two Euros.
For making sure, that there's no dust entering the enclosure through the space where the acrylic glass touches down onto the aluminum, we've got to use some single sided silicone tape.
You should also get some shrink tubes for isolating your wires, where you solder them together, which is something you should anyway always have somewhere close to your soldering station.
General tools required
| Name | Description | Details |
|---|---|---|
| Screwdriver
(sonic or normal) |
Used to screw in the screws | (and potentially fighting against Daleks and Cybermen, in case it's actually a sonic one) |
| A soldering station | Well... it's used to solder stuff | A soldering station comes in handy not only when soldering wires, but also for quick repairs, especially when it includes a hot air gun. |
| A 3D printer | Seriously, why not? | Check out the Ender 3 Pro, it's only a few hundred bucks! |
| A Dremel | It's a very handy multifunctional tool | You need to drill screw holes into the acrylic glass and will need to cut the edges of the perforated metal for fitting it into the frame |
General airflow fan assembly
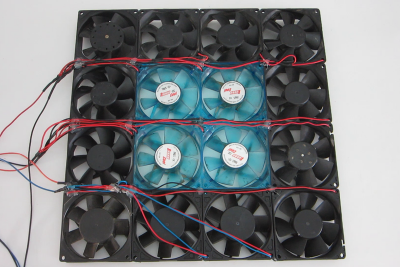
Below you can see a picture of a 4x4 array of 120mm, 12V fans, as used in the glove box air circulation system:
When wiring the fans together into a common 12V power rail, you should keep in mind, that each fan draws around 2 Watts, which means that your wire, you're using to provide power to the fans can drive at least 160mA (milli amps), per fan.
WARNING Do not use too cheap wire, which might go up in flames, use a wire diameter which actually can drive the current
It makes sense to combine only 4 of the fans onto a single power rail at first, and then distributing it onto multiple rails of the power supply you're using.
Any common ATX PSU can be used for providing the required 12 volts, as long as the PSU rails are rated for that kind of power output.
Dimensions: 120mm * 4 are 480mm so 48cms
That means the bottom dimensions, which also result in the width and height have to be at least 48cms.
UPDATE: I've opted to only use a 3x3 array in order to use less electricity and for easier assembly.
Cutting aluminum
The length of the extrusions can easily be adjusted by either using a handsaw or a Dremel.
WARNING
In case you are using a Dremel instead of a handsaw, make sure:
- to protect yourself from the sparks, by wearing a goggle and long sleeves
- cut the material over card board, after protecting the surroundings so that the sparks don't damage the floor or furniture.
Air filtration
Depending on what you wanna use your glovebox for, you might be able to get away with relatively low cost filters, for instance for a class 100 aka. ISO 5 clean room environment, you can find inexpensive filters on - let's say - AliExpress.
A quick look at a website giving us some classes filters which can produce a class 100 clean room gives us a hint on what to look for: https://isocleanroom.co.uk/blog/iso-5-defining-cleanroom-classification-guidelines
Looking for ULPA and HEPA online makes us realize that if we'd go for an ULPA filter we'd have to pay up to 400 Euros for a single filter, while for a HEPA H14 filter we only have to pay between 14 to 30 bucks, like for instance for this cheap vacuum cleaner replacement filter: https://electropapa.com/en/vacuum-cleaner-hepa-filter-replacement-for-nilfisk-107409854-elite-h14-filter
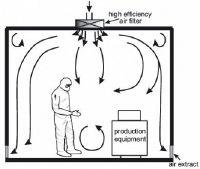
Like with any clean room, the direction of the laminar flow is important, it's usually from top to bottom, like shown in this image:
Make sure your fan array points into the right direction
Counting particles
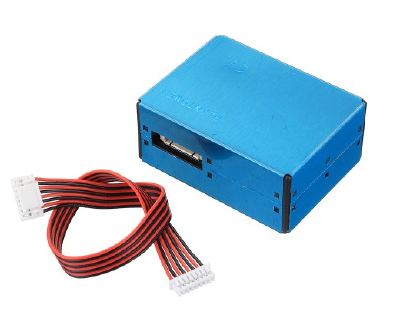
While the common professionally used handheld tools for counting particles in a cleanroom are in the price range of several thousand dollars, there are low cost particle counting sensors, like this one, which provide an UART interface and which can easily be hooked up to a PC or Laptop using an FT232: https://alexnld.com/product/plantower-g5-pms5003-laser-pm2-5-sensor-accurately-detector-smog-serial-port-high-precision/
The gloves
I was able to find relatively inexpensive neoprene gloves, which even allow to do chemical work in the glove box.
They can be ordered here: https://www.manutan.pt/pt/map/luvas-em-neopreno-com-manga-comprida-ultraneo-450-a169336
PVC cutouts
I chose white PVC for the non transparent areas of the box, and because I decided to make the surface out of the same material, I chose white for the color. You should be able to find 3mm thick PVC sheets in you local hardware store.
| Image | Amount | Link to SVG |
|---|---|---|

|
3 | |

|
1 |
Bill of Materials
This design provides a 50cm x 50cm x 50cm cubical space, the blender file and SVG cutouts can be found in the folder "Small" in the git repository:
https://git.libresilicon.com/?p=redmine/mini-clean-room-glove-box.git;a=tree;f=Small
https://www.leroymerlin.pt/Produtos/Aquecimento-e-Climatizacao/Evacuacao-de-fumos/WPR_REF_19385345
| Component | Amount | Price per Piece | Price Total | URL |
|---|---|---|---|---|
| Gloves | 2 | 9,89€ | 19,78€ | https://www.manutan.pt/pt/map/luvas-em-neopreno-com-manga-comprida-ultraneo-450-a169336 |
| 12 volt fans | 18 (2*9, top and bottom) | 2€ | 36€ | |
| Acrylic glass 50cm x 50cm | 4 | 15,99€ | 63,96€ | This is based on the pricing from my local hardware store, the prices might variate based on your supplier. Mine can also cut the material in store. |
| Perforated metal sheet 50 x 50 cm | 1 | 25,79€ | 25,79€ | https://www.leroymerlin.pt/Produtos/Ferragens/Perfis-chapas-e-grelhas/Chapas/WPR_REF_11118485 |
| T-slot extrusion 10mm x 10mm | https://www.ptrobotics.com/makerbeam/2820-makerbeam-600mm-clear-anodised-threaded.html |
